
The Evolution of an Earthquake-Resistant Fast-Fire Wood Kiln
 The Fall
They tell you to expect the unexpected. But, clever though that little oxymoron may be, unexpected is what it is. On the afternoon of Friday, March 11th, 2011, around tea time, I was in my studio just north of Mashiko, putting handles on some vessels. The floor suddenly shifted under my feet as if I were riding a train. The house began to rattle and shake, pots began to fall from the shelves, and the vibration became a roar. I opened the door and rushed outside, turning back to look at the house as I went. It was swaying, like bamboo in the wind. I turned to see the kiln chimney swing left and right, somehow not collapsing yet, but widening cracks appearing up its length. When the tiles came sliding off the roof, I began to run; the children were still at school…
After the family was safe, after we’d established that the house was beyond repair, we evacuated across the mountains, ahead of the radioactive fallout from the Fukushima meltdown. It’s kind of a long story, but we were all okay. We relocated to my wife's hometown of Minakami, enrolled the kids in new schools, and embarked on a fresh start. Not without help, of course; we had the support of family, friends, and strangers, and I have the deepest gratitude to all those who helped us in our time of need.
It wasn’t until much later that I was able to assess the damage to the kiln, which was substantial. The earthquake destroyed most of the wood kilns in Mashiko. Mine was no exception. However, when I initially designed the kiln, I believed I had taken all necessary considerations into account. Obviously, I was wrong.
The First Criteria
Back in 1994, I had written a list of all the criteria for my ideal kiln. First and most important to me was firing with wood. I’d been in love with the unique beauty of wood-fired ceramics since my early experiences of “Olsen Fast Fire” and anagama kiln firing during my ceramics degree at university in Australia in the early ‘80s. My experiences firing wood kilns here in Japan had only deepened that passion. As wood burns, the minerals that trees have drawn from the earth enter the kiln – some as gases that act as fluxes, melting and coloring the clay, and others as ash that settles on the surfaces of the vessels, eventually melting at high temperatures to form natural glazes. This collaboration with natural forces, to flash and glaze the work with a brush of flowing flame, imbues the art with a beauty that is beyond the limits of mere artifice.
 However, my motivation for wood-firing extended beyond that reason. I had also been concerned about the greenhouse effect and the consequences of reliance on fossil fuels since the mid-80s. Burning coal, oil, or gas adds carbon to the atmosphere, which nature had sequestered in the earth long before the evolution of humanity, and increasing these greenhouse gases has led to global warming and climate change. Wood as a fuel, however, is carbon in the cycle within the modern era and is therefore not adding carbon to the atmosphere as long as a balance is struck between forest growth and harvesting. Wood is also a fuel source that can, in most climates, be grown and harvested locally, enabling a circular economy and reducing our reliance on international transport and infrastructure.
From a practical viewpoint, however, it is virtually impossible for a single person to fire a traditional wood kiln. Shimaoka sensei’s wood kiln in Mashiko, for example, took three full days to fire, requiring constant attention and regular stoking in shifts of three people, and a massive ten tons of red pine, which had been dried for three years. Without workers and apprentices, or a team of friends and volunteers who could regularly fit into my work schedule, such a marathon firing was not feasible in the long run. A traditional kiln also requires a lot of space, including the storage space for that volume of wood, plus the cost and time involved in preparing it, which were prohibitive. Conversely, a small rapid fire like the Olsen kiln was too small for a full-time professional practice, and the opposing fireboxes and side door meant that it needed a lot of space around it. It also entailed running backwards and forwards to opposite sides of the kiln to stoke for the duration of the firing, which is probably good exercise but not sustainable.
My challenge, therefore, was to build a wood kiln that I could fire on my own, in a practical time scale of fourteen hours, to high-stoneware temperatures, with a small quantity of virtually any kind of recycled refuse or cheap timber. A kiln that would fit into my 3.6-meter-square (11.8-foot-square) kiln room and hold a month’s worth of pots, say 400 or so, which means a volume of one cubic meter (35.3 cubic feet), and still have room to maneuver around it. It needed to be easy to stack, having a wide door to allow large pots to fit in the kiln without a struggle. And it needed to be inexpensive and of simple construction so that I could build and repair it myself. Despite all these challenges, I managed to maintain the flashing, ash deposits, and inherent serendipitous beauty of traditional wood kilns.
The First Solution
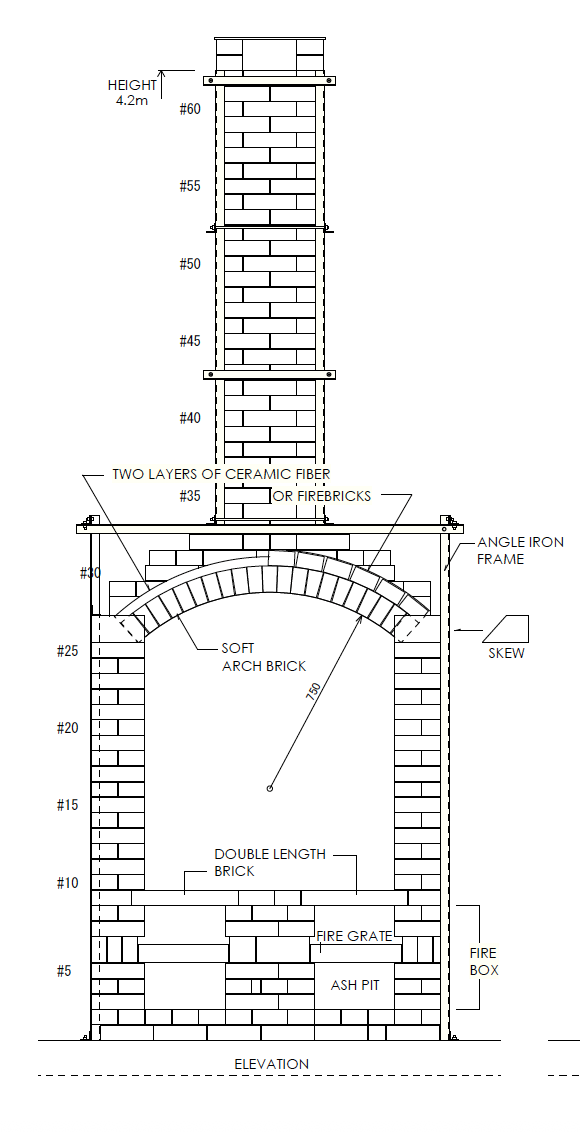
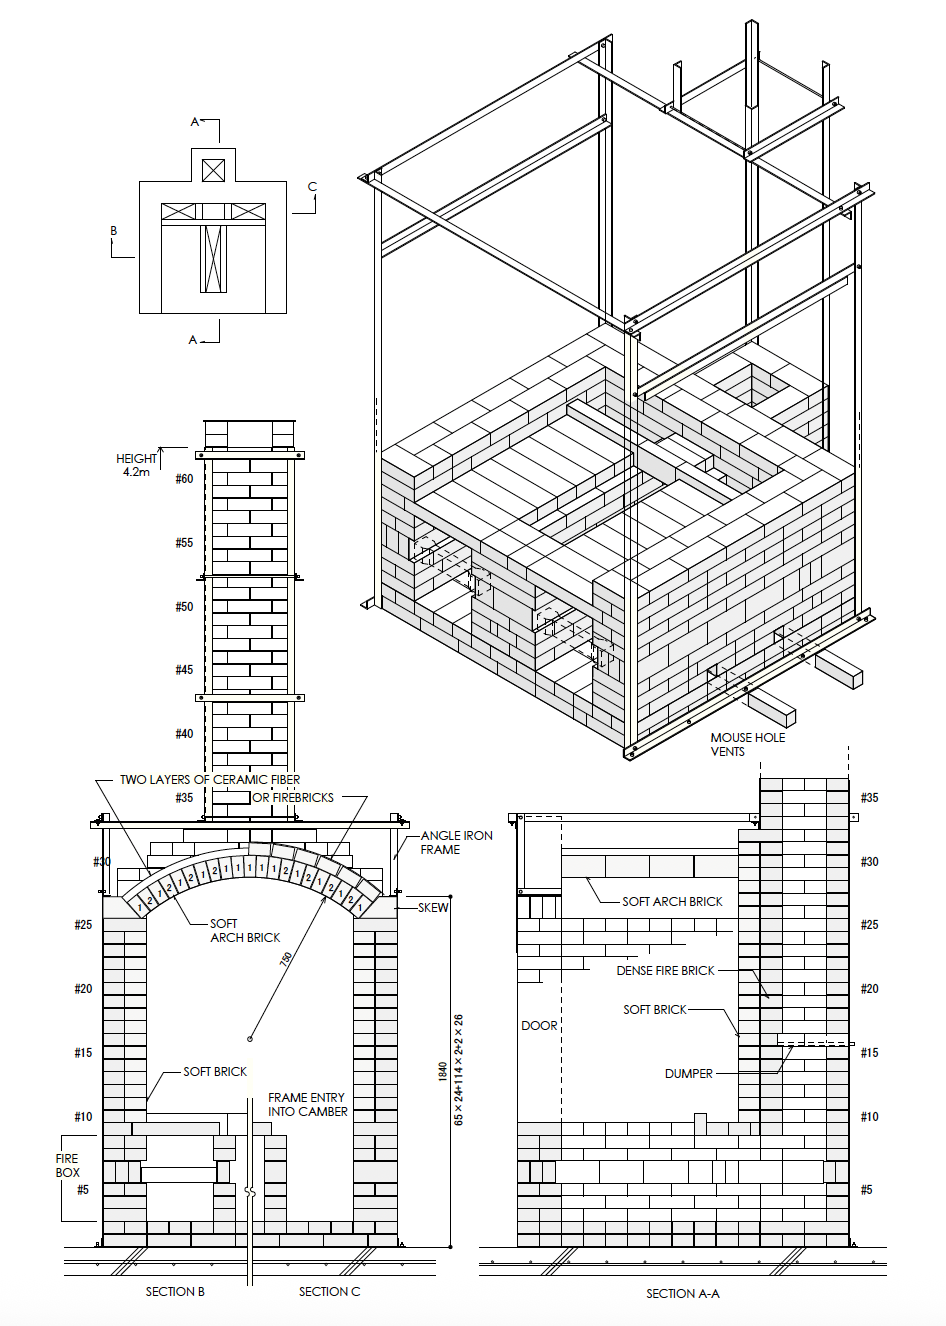
It took me most of 1994 and two failed attempts to finally develop and build a kiln that ticked all the boxes. The solution was a simple sprung arch downdraft kiln with a cubic chamber. The door opened at the front of the kiln, the full width and height of the chamber, which made stacking very easy, particularly for large work, and pieces up to 80 cm in diameter (31.5 inches) and 120 cm (47.2 inches) in height could be fired in this kiln. There were two parallel fireboxes with a high fire grate, the stoking ports facing the front, the flame entry ports into the chamber at the back, and the exit flue between the fireboxes under the chamber floor leading to the chimney behind the kiln. All the serious business, stacking and stoking the kiln, could be done from the front, so less work space was required on the sides, and there only needed to be enough space at the back to adjust the damper.
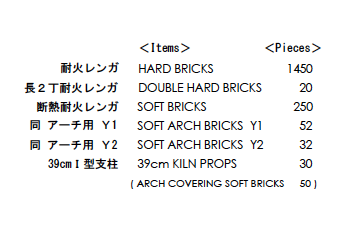 The kiln had a double-wall construction, with insulating firebricks on the inside for efficiency and hard refractory bricks on the outside for structural strength. The arch was also constructed of light, insulating firebricks, with a layer of hard bricks over the top. These features also made it easy to repair or replace the internal wall and arch bricks without disturbing the integrity of the outer shell.
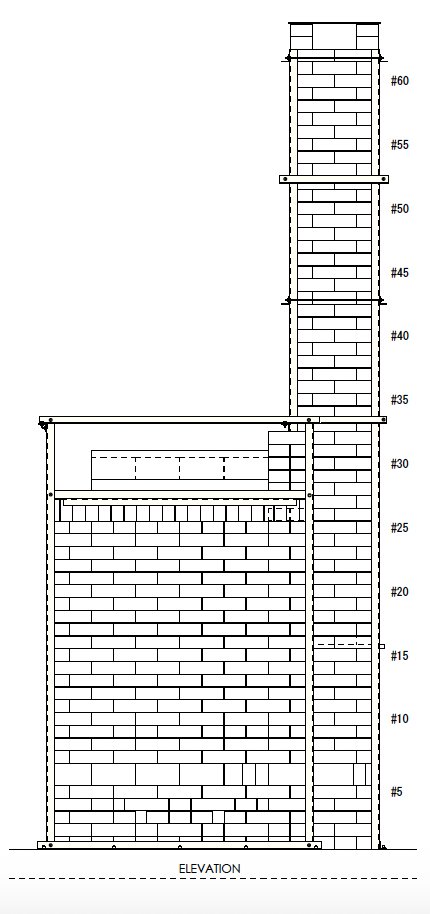
The chimney height was 2.5 times the horizontal distance from the front of the firebox to the inside back of the chimney, making it 4 meters (13.1 feet) tall and creating a sufficient atmospheric pressure differential to pull the flame efficiently through the kiln without wasteful backdraft.
The flame ports from the fireboxes into the ware chamber were at the back of the kiln, and the flame would rise up the back wall to strike a sprung arch. The arch direction was parallel with the fireboxes, forcing the flame from each firebox to travel diagonally across the arch, causing turbulent flow. This arrangement gave more even heat and ash distribution and a faster draught than the laminar flow of conventional perpendicular arch orientation. The flame then flowed around and through the pots and down an exit channel underneath the stack, between the fireboxes at the bottom of the kiln, and out the back to the chimney.
The kiln was supported by a light angle-iron frame, held together at the front and back by threaded rods.
The Firing
This kiln design only uses 400 kg (882 lbs) of dry wood, offcuts from the sawmill, or refuse from the building industry, and it can fire to 1300°C (2372°F) in fourteen hours. The work is once fired, eliminating the need for bisquing, which reduces labor, time, fuel costs, and exhaust fumes. I stack 400 pieces in each firing. There is no bag wall; the pots are stacked up to the fire face so as to maximize ash deposits.
 With the damper fully open, I preheat the kiln by firing both fireboxes at the front underneath the grates, climbing at 100°C per hour (180°F per hour) until the kiln reaches 600°C (1112°F), or after the alpha/beta quartz conversion at 573°C (1063°F), when the silica in the clay body expands by 2%. Firing too quickly at this temperature is the main cause of heat cracking. You could fire pre-bisque pots faster, but you still need to exercise caution in this temperature range. After 600°C, I start stoking the kiln on top of the fire grates, throwing the wood to the back of the firebox. The fire mouths, or primary air ports, are open throughout the firing, allowing the maximum possible amount of air to be drawn into the kiln by natural draft, preheating it as it flows over the embers under the grate. As it strikes the back of the grate, the carbon in the wood instantly reacts, igniting a flame.
It is important not to over-stoke, as this will choke up the kiln, reducing airflow and stopping heat rise. More wood does not necessarily mean more heat. Heat is caused by the reaction of carbon and oxygen. Too much carbon and not enough oxygen mean incomplete combustion and poor heat production.
 Nor does more wood necessarily mean more fly ash. Clogging up the kiln with too much wood means restricting air flow, so there is less wind to carry the ash into the kiln. Think of it in terms of a dust storm; the more wind, the more the dust gets blown around. If you put up a barrier, it creates a lee of calm air where the dust does not carry. If you create a barrier in your firebox by putting in too much wood, the ash will not be carried into the kiln to settle on the pots.
I half-close the damper at 700°C (1292°F) to give a neutral atmosphere, and by 900°C (1652°F), the kiln is reducing naturally. I start with 2 kg (4.4 lbs) of wood per stoke and lessen it to 1.5 kg (3.3 lbs) by the end of the firing. Particularly around the 1100°C (2012°F) mark, you need to lessen the amount of fuel going into the kiln to maintain the same reduction and heat rise. There is a small flame port at the top of the door to show the reduction level. When I stoke, a flame will spurt out of this hole; the free carbon is searching for oxygen to combust. When this flame sucks back in, the kiln is in neutral and ready to be stoked again.
 Having two fireboxes allows me to alternate stokes, providing reduction inside the chamber from a fresh stoke in one firebox, while the other firebox passes from reduction into efficient combustion, providing heat climb. When the fuel is depleted, stoke the exhausted firebox, and repeat. Thus, the kiln could be fired in heavy reduction and still achieve efficient combustion and rapid heat climb. If you watch your pyrometer, you will see that there is a drop in temperature every time you stoke. This is because the wood is absorbing heat from the kiln before it reaches a temperature where the carbon is ready to react with the oxygen to create more heat. Your pyrometer will then rise again, usually to just above the temperature it was before the last stoke. If you are firing with a single firebox kiln or stoking both fireboxes simultaneously, then this drop and rise will be quite significant. By stoking alternately, one firebox is dropping while the other climbs, so there are not such violent changes in temperature. Just by changing the timing of each stoke you can keep the kiln in reduction virtually constantly, alternate between reduction and neutral, or alternate between reduction, neutral, and oxidation.
 I reduce the kiln up to cone 10 and soak for one hour. If you want more ash, then it is best to reduce the temperature to 1230-1250°C (2246-2282°F) and soak for a longer period. At this temperature range, the ash is no longer fluid but remains sticky, and new ash will adhere easily to the toffee-like surface. After the soak, it is important to bring the kiln back up to 1300°C (2372°F) to flux the ash deposits. I then allow the kiln to crash cool down to 1100°C (2012°F). This stage takes an extra half an hour or so and prevents the formation of cristobalite, thus eliminating shivering. As I am firing with high-silica porcelaneous clay, slow cooling at high temperature can cause the vitreous silica to form cristobalite, a form of silica that does not undergo the alpha/beta 2% shrinkage at 573°C (1,063.4°F). If cristobalite forms, then, as the pot cools, the free silica surrounding the cristobalite will try to shrink, causing internal stress, and the pot will shatter, to all appearances dunted. It takes time for crystals to form in a liquid, so crash cooling in half an hour from 1300°C, when the silica is molten, to 1100°C, when it is set solid, doesn’t give the crystals time to form, and the problem is solved.
The Second Solution
That original kiln, which was built entirely of second-hand bricks, was fired fifty times. I rebuilt it, with some improvements to the fire grate and new inside bricks, when we moved to a larger house near Mashiko when the kids came along. I fired that kiln over a hundred times, once a month for eleven years, and was happily ever aftering until, as I have mentioned, the unexpected. Neither the kiln nor the house was designed to withstand a 6.6 earthquake on the Shindo scale.
The time had come to add new criteria: disaster-proofing.
It took us a while to get to the point where I could build a new kiln, but when I did start in 2012, I wanted to incorporate the lessons I’d learned. We salvaged all the useful bricks from the old kiln and began construction by hiring a contractor to build a reinforced concrete foundation. The previous kiln had been built on an existing concrete floor, which, unbeknownst to us, was thin and devoid of reinforcing. It is impossible to gauge the degree of liquefaction in the soil beneath that floor during the earthquake, but the concrete crumbled under the 7.5-tonne (16534.7 lbs) weight of the kiln. So, for the new kiln foundation, we poured a steel-reinforced concrete slab, 30 cm (11.8 inches) deep around the edges and 15 cm (5.9 inches) across the center. Even if an earthquake loosens the soil beneath the floor, the slab should maintain its integrity as a single unit floating on top.
One of the biggest design flaws in the original kiln was the chimney. It was independent from the main body of the kiln by a brick-width space and stood 4 meters tall (13.1 feet). During the earthquake, the ground moved in both the vertical and horizontal planes, shuddering and swaying like the deck of a ship on a stormy sea. The isolated spire of the chimney was like a tall stack of Jenga blocks, and, despite having light angle-iron supports, it was just too precarious to survive the ride. This problem was resolved by eliminating the gap and integrating the chimney into the back wall of the kiln, making the kiln and chimney a single unit up to a height of 2.2 meters (7.2 feet). Heavy angle iron, extending the whole height of the chimney and bolted to both the main kiln frame and the concrete floor, supports the remaining 1.8 meters (5.9 feet) of chimney above the kiln.
 Another issue was the structure of the sprung arch, which had been constructed by combining angled and straight insulating fire bricks. The vertical vibration allowed the straight bricks to slide out of position, compromising the arch. In the new design, the arch is shorter, butting up against the back wall and recessed from the front of the kiln to allow the door to be built straight up flush with the arch face. I hand-ground the straight bricks from the original kiln into the necessary angle and constructed the arch out of angled bricks only. A mixture of fireclay and vermiculite adobe was then spread on top of the arch to form an insulating coating, rather than a heavy layer of hard brick. Thus, the arch is lighter, more compact, and far more stable.
Much of the damage to the kiln was caused by it bouncing and sliding on the crumbling floor, literally shaking it to pieces. A much sturdier angle-iron frame has been built around the new kiln, held together with bolts rather than welds, as welds don’t flex, neither to absorb the expansion and contraction of the kiln during firing nor in the rigors of an earthquake. The frame binds the kiln together in an iron embrace, and it has been anchored to the reinforced concrete floor with high-tensile anchor bolts. In this way, the kiln and the foundation will be moved together as a whole, making it far more resilient.
I have used fireclay instead of refractory mortar to allow the bricks to expand and contract without cracking and to make kiln maintenance easier. Refractory mortar contains sodium silicate as a flux to melt the mortar into the surface of the brick during firing. The bricks can no longer move to absorb expansion stress and will therefore tend to crack. They are also hard to separate for repair or replacement without damaging the surrounding bricks. Fireclay is much more forgiving.
We were not directly affected by the tsunami, and now that we are living in the mountains, I’m sure that we are out of harm’s way. But the tsunami was instrumental in the meltdown at the Fukushima Nuclear Plant, and the radioactive fallout contaminated much of the Tohoku and Northern Kanto areas. It was a long time before we knew just how bad and widespread this contamination was. What it meant for wood-firers, like myself, was that vast areas of forest were no longer harvestable. This meant that any firewood we used had to be tested for radioactive materials, such as cesium.
Any radioactive material on the wood would be concentrated 200 times in the ash, meaning anything above 40 becquerels of contamination on the wood becomes 8,000 becquerels (a becquerel represents one radioactive decay per second) in the ash, above safe limits for handling. And it is that ash that becomes the glaze on wood-fired pots. So, of course, since my first firing in the new kiln in the summer of 2012, I have only used wood that has been tested by the forestry department and shown to have no detectable radioactive materials. The situation is much better now, fourteen years after the disasters, but it is always best to err on the safe side.
When I built the kiln shed, mostly out of recycled materials, I screwed down the roofing iron, instead of nailing it, to protect it from typhoons. A lesson learned from Cyclone Tracy in Darwin in 1974.
It is snowing as I write this; 70 cm (27.6 inches) is forecast for today, and the same for tomorrow, but I’m confident the kiln shed can bear a lot more than that. I’ve done at least another hundred firings in the new kiln, but now I’m firing to cone 12, and I’m very pleased with the results.
We learn from our experiences, find solutions to problems, and share them. We try to mitigate against possible risks and dangers, but there are times when we need the help of others and gratefully accept it when it is offered. Other times, we help where we can, and slowly, we all move forward. And that’s all tradition is: the accumulated innovations of countless generations, the solutions they found, layer upon layer, passed down to us as a foundation to build on. Hopefully, our innovations will form a foundation for others. It’s hard to prepare for the unexpected, and we never know what challenges life will present to us until they turn up. Until they do, I look forward to happily ever aftering here in the mountains of Minakami, and I think – I hope – I believe I have all the necessary preparations in place.
The following link will direct you to a PDF of Euan Craig's full kiln design and specs.

